
|
Quick setup
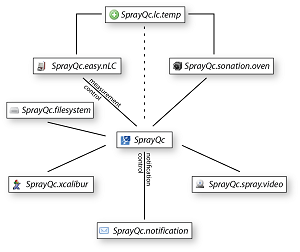
This describes the steps involved in succesfully setting up the SprayQc application and its respective plugins. When a certain plugin is
not desired, the associated DLL (e.g. sprayqc.video.DLL) can simply be removed from the directory where SprayQc is installed.
- Standard Thermo setup for the control PC: Quad-core CPU with 4Gb of RAM.
- Microsoft Windows XP / Vista / 7 (32-bit)
- Sonation column oven and control software version >= 3.2.
- A video-server (e.g. Grand IP video server).
- Thermo nLC (support for other LC devices is underway).
- MSFileReader latest version.
The control PC is required to be run with full administrator rights to prevent any problems with blocked access.
When all software listed above has been installed you can start the application. The plugins automatically have reasonable settings for
most of their options. Below is a description of how to change the most important settings. For more information on these settings and the
additionally available settings.
| Plugin setup SprayQc.notification |
|---|
Select Mail [notification] in the plugin list. For each operator enter an operator-id (encoded in the filename, see Plugin setup
SprayQc.filesystem) and the associated e-mail address. An entry can be added by pressing the  button, which opens
a dialog. button, which opens
a dialog.
| Plugin setup SprayQc.filesystem |
|---|
Select 'File system settings' in the plugin list. Review and optionally change the 'RAW file directory'. Additionally, review the rule for
the 'RAW filename format'. When a different format is required it can be change here (for more information, see View - File system settings).
| Plugin setup SprayQc.video |
|---|
Select 'Video settings' in the plugin list. Review the URL used for accessing the video server. The server needs to be setup according
to the supplied manual and the correct method of accessing the images can be found at
Crazy Pixels.
For optimizing
the column tip extraction please refer to 'View - video settings'.
| Plugin setup SprayQc.thermo.nLC |
|---|
Select 'Proxeon settings' in the plugin list. Review and change the URL used for accessing the nLC server.
The first time the application is started and monitoring is commenced (press the button  in the toolbar),
Windows will ask whether the network access for application should be blocked. in the toolbar),
Windows will ask whether the network access for application should be blocked.
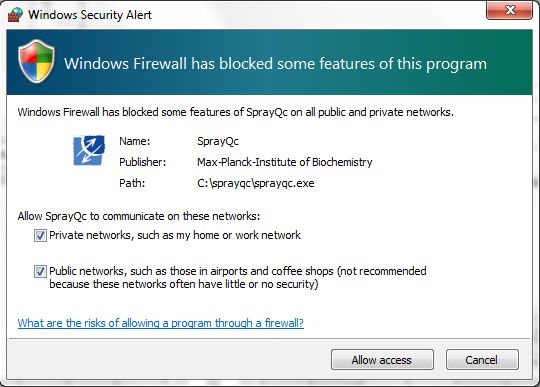 Mark all the check boxes and press "Allow access".
|
|